Table of Contents:
Create Invoices for Individual Orders
Combine Orders into One Invoice
Combine Documents into a Single PDF
Adding "Reply-To" Email Address when Sending Invoices
Watch our video walkthrough below:
Create Invoices For Individual Orders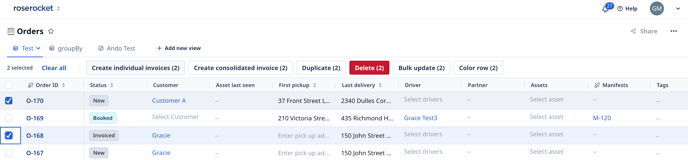
- From the Invoice Items Board or Orders board, select the orders you want to invoice.
- Click "Create Individual Invoices" to generate an invoice for each selected item.
- You will be taken to the Invoices board, where the new invoices are displayed.
- When you're ready, review each invoice and send it to the customer.
Combine Orders into One Invoice
If you have shipped multiple orders for the same customer and need to combine them into a single invoice, follow the steps below: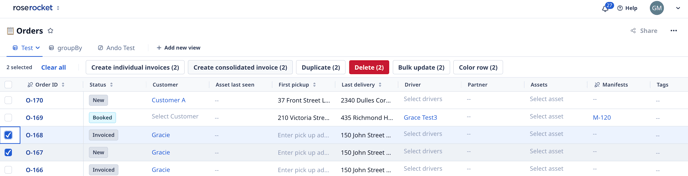
- From the Invoice Items Board or Orders board, select the orders you wish to create an invoice for.
- Proceed by clicking "Create Consolidated Invoice".
- Review the line items and select "Add Line Item" to include additional charges.
- Finalize your changes by clicking "Save."
- Enter the recipient's email address and click "Share" to send the invoice to your customer.
- To download the Invoice PDF or access other relevant documents, head to the Documents tab and click on any items in the list.
Orders must be for the same customer and in the same currency.
This feature is available for paid customers with Account Receivables - Tier 1 Module. Contact support@roserocket.com to learn more.
Combine Documents into a Single Invoice
-
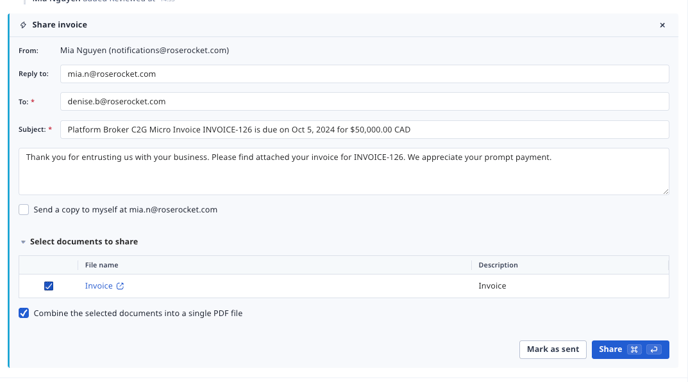
In the Account Receivable module, within the “Send Invoice” widget, users will have the option to select multiple documents, such as POP, POD, the Invoice PDF, and any other relevant files.
-
Checkbox the documents that you want to combine, then click "Combine the selected documents into a single PDF file" to merge these documents into one file before sending the email.
-
Once selected, the system automatically merges the selected PDFs and attaches the single combined document to the invoice email.
Adding "Reply-To" Email Address When Sending Invoices
Tired of missing replies from your customers when sending invoices?
The "Reply-To" feature in the Account Receivable module allows you to set a custom reply email address for outgoing invoices, ensuring customer replies go directly to your email inbox.
- The field will be pre-populated with the current user’s email address, which is set as the default reply address for any emails sent through the system.
- Users will have the ability to manually change the "Reply To" email if they wish to direct responses to a different address.
- When customers reply to an invoice email, the reply will be sent to the email address specified in the "Reply To" field, ensuring seamless communication between the user and their customer.

Export to Quickbooks Online
Follow this article to learn how to export invoices to QuickBooks.
Set Up Online Payments
Set up Online Payments to receive payment directly through Rose Rocket.