Freight brokers can generate carrier portal webpages when sending loads to their partner carriers. Carriers can upload documents, complete tasks, and view invoices within a single webpage, eliminating the need for multiple communication channels.
This article will guide you through how to share manifests, what features carriers can access, and how this tool enhances collaboration.
Benefits of the Shareable Manifest Feature
- Centralized Communication: Share all relevant manifest details with your partner carriers, reducing back-and-forth emails.
- Document Upload: Carriers can upload critical documents, such as Proof of Delivery (POD), directly to the manifest.
- Task Completion: Carriers can complete assigned tasks and track their progress in real time.
- Invoice Viewing: Carriers can view and manage their invoices through the shared platform.
Table of Contents
1: Sharing Manifests with Partner Carriers
2: What Can Partner Carriers Do with the Manifests?
3: Task Management and ETA Updates
4: Invoice Upload and Bill Generation
5: Customize Workflows and Data Fields
6: Customize View or Edit Access for Partner Carriers
Step-by-Step Guide to Sharing Manifests
Check out the walkthrough video below, or scroll down for the written tutorial:
Step 1: Sharing Manifests with Partner Carriers
-
Access the Order
- Log in to Rose Rocket and navigate to the Orders section, click on the Order that you want to share with your partner carrier
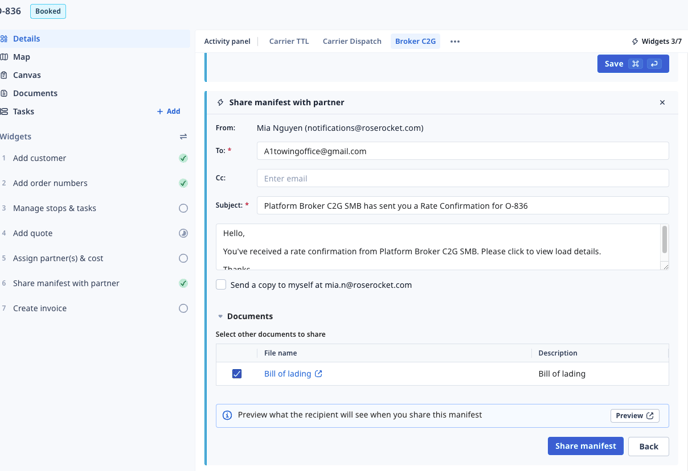
2. Click Share Manifest with Partner Widget
- The Share manifest with partner widget will pop up. Input the carrier's email address
- Before sending the manifest to your partner carrier, you can click Preview to see what the carrier will receive
- Click Share manifest

Step 2: What Can Partner Carriers Do?
Once shared, partner carriers will have access to the following features:
-
View Rate Confirmation
- Review the details of the load before accepting the offer

- Review the details of the load before accepting the offer
-
Upload Documents
- Partner carriers can upload documents such as Proof of Delivery (POD), photos, or other necessary paperwork directly to the manifest.
-
Complete Tasks
- Carriers can view tasks assigned to them and mark them as complete once done. The task status is updated in real-time for the broker to view.
-
Submit Invoices
- Once the trip is complete, carriers can submit the invoice and upload documents directly from the manifest, streamlining the billing process.
Step 3: Task Management and ETA Updates
-
Complete Assigned Tasks:
- Partner carriers can see all assigned tasks and their respective due dates.
-
Update ETA:
- Carriers can manually update the Estimated Time of Arrival (ETA) for the deliveries on the manifest.
-
Track Task Status:
- Task completion status and any associated ETA notes will be visible to both brokers and carriers.
Step 4: Invoice Upload and Bill Generation
- Submit Invoices:
- Partner carriers can upload an invoice and generate a bill within Rose Rocket, reducing the need for external communication.
- Line Item Management:
- The rate confirmation amount is auto-populated on the invoice, and carriers have the option to add additional line items before submission.
Step 5: Customize Workflows & Data Fields
You have the ability to create new steps or data fields for your partner carriers and grant them view or edit access to these fields.
- Go to Settings -> Builders -> Widgets

- Go to the Manifest tab, the list of Available Widgets will appear
- To create a new widget, click Create custom widget and then add the widget to the list of Selected widgets

- To customize the list of widgets available for users outside of your company, such as your partner carriers, click External.
- Switch the toggle to green for all the widgets you want your partner carriers to see.

- Below is a sample Manifest that your partner carrier sees; the Dock Number widget has been added to their view.

Step 6: Customize View or Edit Access for Partner Carriers
- Go to Settings -> Users, Roles, Groups -> Roles

- Go to the External role, designed for users outside of your organization
- Then go to Manifest to review all the permission settings available for the External users

- Scrolling down to the Data section and click Edit

- Review the fields and update the Access Type for the fields of choice
- You can update the field permission to Read-only, Edit or No Access
- Once done, click Save changes

-01%20(Custom).png?height=120&name=Rose%20Rocket%20Logo%20(Alternate)-01%20(Custom).png)
