Table of Contents
- What is Object Builder?
- Add a new field
- Add a new field: formula fields
- Edit existing fields
- What is a data panel?
- Modify what you see in the data panel
What is Object Builder?
Object Builder is a module within settings that lets you customize Objects within the Rose Rocket platform. Object Builder allows you to:
- Edit and hide existing fields to include more options beyond the system defaults
- Add new custom fields so you can capture and act on important data
- Modify the format of the internal and external data panel
Reminder: An object is a type of information stored in Rose Rocket. Orders, Quotes, Manifests, Tasks, Customers, Invoices, Customers and Partners are all Objects. Each Object has a series of associated fields, which typically show up as columns.
In the example below, Quotes are the Object, with many associated fields, such as Quote ID, Status, Type, and Customer.

Add a new field
Do you have something specific you want to track that isn’t in the platform by default? You can create a custom field to reflect what you want to see and measure.
To create a custom field, go to Settings and then Object Builder. The interactive guide below explains how to add your new field.
Adding a new field: Formula Fields
Formula fields let you calculate or combine data from other fields automatically. Instead of manually entering values, you can create formulas that update whenever the source data changes.
Common use cases:
- Build custom lane IDs that match your team's naming convention
- Format time values to be human-readable
- Combine customer information into a single reference field
- Build custom date fields that automatically filled based on Addition/subtraction logic (eg; putting an "alert for payment" date for orders that are +1 day after delivery task)
How to Create a Formula Field
- Go to Platform Settings → Object Builder
- Select the object type (Orders, Quotes, etc.)
- Click Add Field → Choose Formula Field
- Enter your formula (For Example: excel-like functions like
concat()ordateAdd()orformatTime()) - Name your field (e.g., "Lane ID" or "Pickup Time Formatted")
- Review the sample output in the formula field editor. If it returns your intended value - it's good to save!
- Click Save
The formula will automatically calculate values for all existing and future records.
Tips for Formula Fields
- Test your formula first: Create the field on a test order to verify the output looks correct
- Use descriptive field names: "Lane ID" is clearer than "Formula 1"
- Combine functions: You can nest formulas like
concat('Pickup: ', formatTime({pickupTime})) - Fields update automatically: When source data changes (customer name, pickup time), formula fields recalculate
Need Help?
If your formula isn't working as expected:
- Check that source fields exist and have data
- Verify field names are correct ({customer.name} not {customerName})
- Contact support or your account executive for complex formula needs
Edit existing fields
Each object in Rose Rocket has a number of default fields, each with a fixed field type (e.g. text, multi-select) and a set of default options.
You can customize the options and formatting of these fields based on your preferences. Note that you are not able to change the field type of a default field. If you need to capture data in a different field type, try adding a new field to reflect what you want to track.
Check out the walkthrough below to see how you can edit existing fields.
Note: Default fields can’t be deleted or re-named in Rose Rocket. However, if you don’t want to use a particular field on one of your boards, simply click on customize columns and remove that column from your view (don’t forget to hit save!). Custom fields can be deleted at any time by editing that specific object.
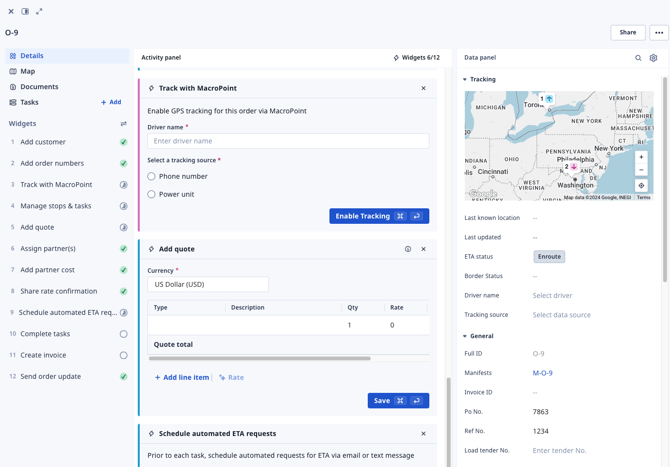
What is a data panel?
When you click into a record (an instance of an Object, such as an individual Order), you’ll see Rose Rocket’s default view below. This view contains a data panel, which displays all of your fields.
Your users' data panel is the Internal data panel. When you share a record with someone outside of your Rose Rocket organization, they see the External data panel.
Modify what you see in the data panel
Change the layout of both your internal and external data panel with Object Builder. With this feature, you can control which fields show up to internal and external users, including any custom fields you create.
Use Object Builder to re-arrange fields, hide fields you don’t want to see and edit section names. Check out the video below for a step-by-step guide.
Note: Trying to hide a field from your boards? Removing a field from your internal or data panel doesn’t prevent that field from showing up on your boards. To hide a field from your boards, click on customize columns and deselect that column from your view (don’t forget to hit save!).